Documentation - Zenbu + Hokoku Bundle
Installation
Usage
Usage documentation can be found in each add-on's documentation:
Installation
- After unzipping the file, place the "kyara" folder and its contents in the third_party folder of your expressionengine installation.
- In the control panel, go to "Addons => Modules" and the Kyara module should bve displayed. Click the corresponding "Install" link.
- In the following page, select "Install" for the Accessory, Extension and Module.
The Kyara module is now installed. To setup and access the module:
- In the control panel, go to "Addons => Extensions" and click the "settings" link next to the Kyara extension.
- Enter your product license number you received when you purchased the addon.
- If you wish to use the character counter in the control panel, check "Show counter for fields in this addon".
- Click Submit to save the changes.
The Kyara module is available from the control panel under "Addons => Modules => Kyara".
Usage
Field Lengths
Change the value of the maximum number of characters that can be entered in a number of fields in the control panel. This can be useful when longer entry titles, member names, channel names, field labels, etc are needed. Longer field labels also facilitates decorating your EE field labels with HTML.
Each row of this section contains the field name as seen in the database, a short description of its role in the control panel, the current maximum allowable characters, and a field to modify this number, respectively. To make modifications:
- From the Kyara module, select the "Field lengths" tab in the top right of the module.
- Change the maximum character values for your target fields.
- To apply the changes, click the Submit button at the bottom left of the page*
* WARNING: Changing database field values is permanent, which means that these values will not revert back to their original values if the module is uninstalled. Setting the field length to a value lower than the original value may lead to truncation of data.
Modifications done here are your responsibility only. We are not responsible in any way for data damage or loss.
Enabling the character counter for fields found in the module
After enabling the included Kyara extension and accessory in the control panel, check the "Show counter for fields in this addon" option in the Kyara extension's settings. A counter showing the number of remaining characters will then appear under targeted fields, such as entry title, when typing.
Table Encodings
Installing addons or upgrading EE can sometimes leave tables in certain collation/charsets, and combined with the "Automatically Convert High ASCII Text to Entities" option set to "No" in the control panel (Admin => Channel Administration => Global Preferences), can lead to foreign and multibyte characters not being saved correctly in the database. In other cases, tables may require a specific collation/charset based on special needs (eg. a database table in your EE installation requiring iso-2202-jp for Japanese). This addon allows the modification of tables containing collation and charset settings to easily fix these problems. To make modifications:
- From the Kyara addon, select the "Table encodings" tab in the top right of the module
- A listing of all tables with collation/charset information is displayed. Change the table collation from the dropdown in the third column. You may also set all tables to Unicode (UTF-8) by clicking the "Set all to UTF-8" button in the third column header.
- To apply the changes, click the Submit button at the bottom left of the page*
* NOTE: Changing the charset/encoding of a database table is permanent, which means that table charset/encodings will not revert back to their original values if the module is uninstalled. Modifications done here are your responsibility only. We are not responsible in any way for data damage or loss.
* WARNING: Changing table charset/encoding can potentially lead to garbled data (eg. garbled characters) in some cases. Please make sure to have a valid and working backup of the database in case a database restore is required. Modifications done here are your responsibility only. We are not responsible in any way for data damage or loss.
Database Backup
Kyara comes with a database backup utility, which sends the backed up database as a file to your browser for you to download for safekeeping. A number of options can control the tables being backed up, the backup file format and name, as well as other database features.
NOTE: Before making any changes in the "Field lengths" and "Table encodings" section, it is recommended to make a backup of your database.
NOTE 2: This tool uses CodeIgniter's internal database backup library, which can at occasion be basic. Due to the limited execution time and memory available to PHP, backing up very large databases may not be possible. If your database is very large you might need to backup directly from your SQL server via the command line, or have your server admin do it for you if you do not have root privileges.
NOTE 3: (especially for users with non-English data): Although backed up text should not contain garbled characters, please double-check that the outputted file contents are well encoded (i.e. text is not garbled).
To backup your database:
- From the Kyara module, select the "Database backup" tab in the top right of the module.
- The left table contains all the tables in your EE installation, select the tables you want backed up by checking the corresponding checkbox in the "Backup" column. You may toggle selection of all tables from the checkbox in Backup column header.
- The right table controls the database file output. Options:
- Database backup format: You may save the database as plain text (.sql file, "txt" option), or as a zipped ("zip" option) or gzipped ("gzip" option) file.
- Filename: Write the filename of the output file. MySQL date format is also allowed (eg. %Y%m%d %h:%i%s), similar to ExpressionEngine's date format variables.
- Add DROP TABLES: Adds the DROP TABLE command in your database backup. If restoring a database, any previous table with the same name as your backed up table will be dropped and overwritten before your table is installed.
- Add INSERT: Adds INSERT command with your table data to your database backup. Unchecking this option will create an empty table backup with no data rows.
- To download the backup file, click the "Backup" button. Your file will be available for download to your computer.
Installation
- Unzip the zip file you have downloaded
- Copy the henshu folder found at system/expressionengine/third_party/henshu into your system/expressionengine/third_party/ folder
- Copy the henshu folder found at themes/third_party/henshu into your themes/third_party/ folder
- In the Control Panel, go to Add-Ons » Modules and click the "install" link next to "Henshu"
- Install both the module and extension
- You can access the addon from the Modules section of the Control panel.
Update Instructions
- Unzip the update zip file you have downloaded.
- Copy the henshu folder found at system/expressionengine/third_party/henshu into your system/expressionengine/third_party/ folder, overwriting its contents.
- Copy the henshu folder found at themes/third_party/henshu into your themes/third_party/ folder, overwriting its contents.
- In the Control Panel, go to Add-Ons » Modules and click the “Run Modules Updates” link in the top right of the screen.
- The module list should then show the latest version of the add-on.
Enabling access to Henshu for other member groups
As Henshu is a module, to enable access to Henshu for target member groups outside of Super Admins, module access must be enabled.
- In Members » Member groups, click the Edit group link for your target member group
- Enable (set to “yes”) the following permissions:
- Module Access Privileges » Can access module: Henshu
- Control Panel Access » Can access ADD-ONS section
- Control Panel Access » Can access ADD-ONS » Modules
- At the bottom of this page, click the “Update” button to save these settings.
A shortcut to the above is also available from the Permissions section of the Henshu module in the CP.

Usage
- On-the-Fly, Inline Editing of Channel Entries
- Multi-Entry Editing
- Fieldtype Whitelist (deprecated since 0.7)
On-the-Fly, Inline Editing of Channel Entries
In Zenbu
After installing Henshu, visit your Zenbu entry listing in the Control Panel. Hovering on each entry table cell will display a small Edit Icon. Click this icon to enter Henshu's Edit Mode.
For basic entry data, such as entry title, status, author, date, expiration data, etc, Edit Mode will display an input text or select dropdown to start editing your entry data. Click the Save button, and the cell will refresh with the new data.
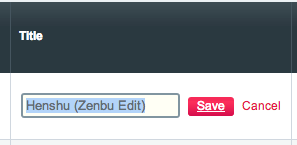
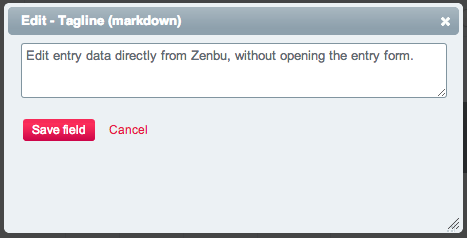
For custom fields, Edit Mode will display a modal window with the selected custom field. After editing the field, click the Save button and the cell will refresh with the new data.
Clicking the modal's top-right "X" button, outside the modal window, the "Cancel" link or pressing the Esc key closes the window and cancels your changes. The modal window is also resizeable from its bottom-right corner if it becomes too small or is too big.
In EE's Channel Entries Section (Zenbu not installed)
After installing Henshu, visit your entry listing. A left column should appear next to the entry IDs, each containing an Edit link to enter Edit Mode for the corresponding entry.
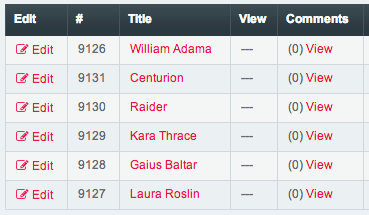
Clicking the Edit link will display a modal window with a select dropdown field. Select a custom field to edit and click the Edit Field button. The custom field will be displayed on a new page. After editing the field's contents, click the Save button and you are sent back to the EE Channel Entries Section.
Multi-Entry Editing
Multi-entry editing is already supported native in EE, and improved upon in Zenbu. However, editing is limited to a few basic pieces of data: title, url_title, entry date, status, sticky yes/no, comments on/off, and categories.
Starting with Henshu 1.0.0, custom fields can also be edited across multiple entries (used with Zenbu only). This multi-entry custom field editing allows you to set a field to the same value across multiple selected entries. For example, if you have a few entries with a custom field containing "no", you could use Henshu to set all those entries to "yes".
Note: This feature enables setting a field to the same value across multiple selected entries. It does not allow editing of custom fields for selected entries one by one. This will change ALL selected fields to the value inputted in the field, and will overwrite any data in the custom field for the selected entries. This cannot be undone.
To edit multiple entries (used with Zenbu only), select these entries by checking their checkboxes in the Zenbu entry listing. At the bottom of the listing, select the custom field that you want to edit from the dropdown (you also have the choice to edit basic entry data by selecting "Basic Entry Fields") and click "Edit".
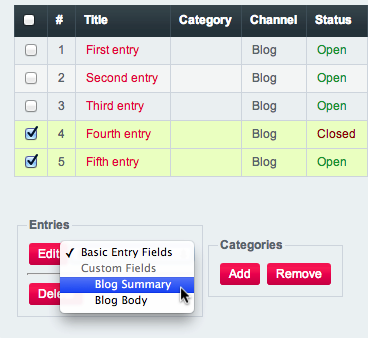
You are then sent to a page with your custom field. This field is initially empty. You may review the entries selected by opening the "View Selected Entries" tab above the custom field.
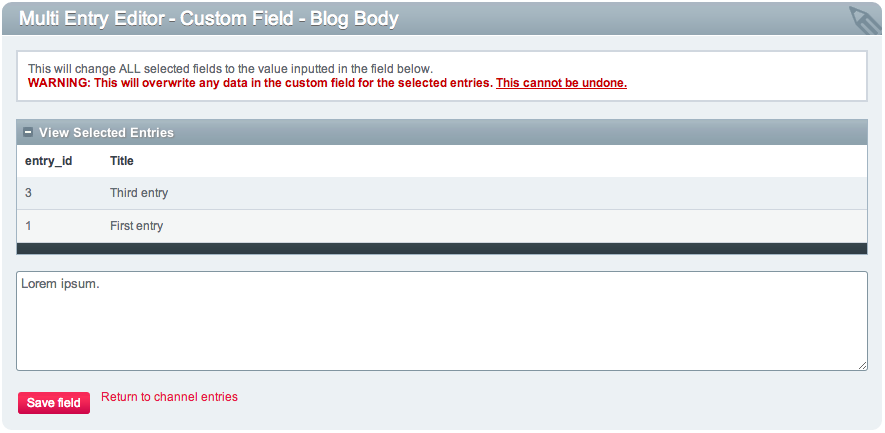
Fill it out with your data and click "Save Field". Selected entries will now contain the data you entered for this custom field. If you submit the form empty, selected entries will now have this custom field empty.
NOTE: This will change ALL selected fields to the value inputted in the field below. This will overwrite any data in the custom field for the selected entries. This cannot be undone.
Fieldtype Whitelist: Initial Setup by Super Admins
Deprecated/Not available since 0.7.0
Henshu uses the EE Channel Entries API to update entry data. Some custom fields may expect data formatted in a specific way before saving to the database, which the API may not handle correctly. This can result in deletion of this custom field's entry data.
To prevent data accidental data deletion, Super Administrators (only) are asked to test and whitelist custom fieldtypes before using Henshu in channels that contain them.
You can whitelist fieldtypes that you are sure do not lose their data if another entry data element is edited from the left table. When all fieldtypes for a channel are whitelisted, channels on the right will be marked with a green checkmark. Channels with a red cross are not whitelisted and Henshu cannot yet be used on them.
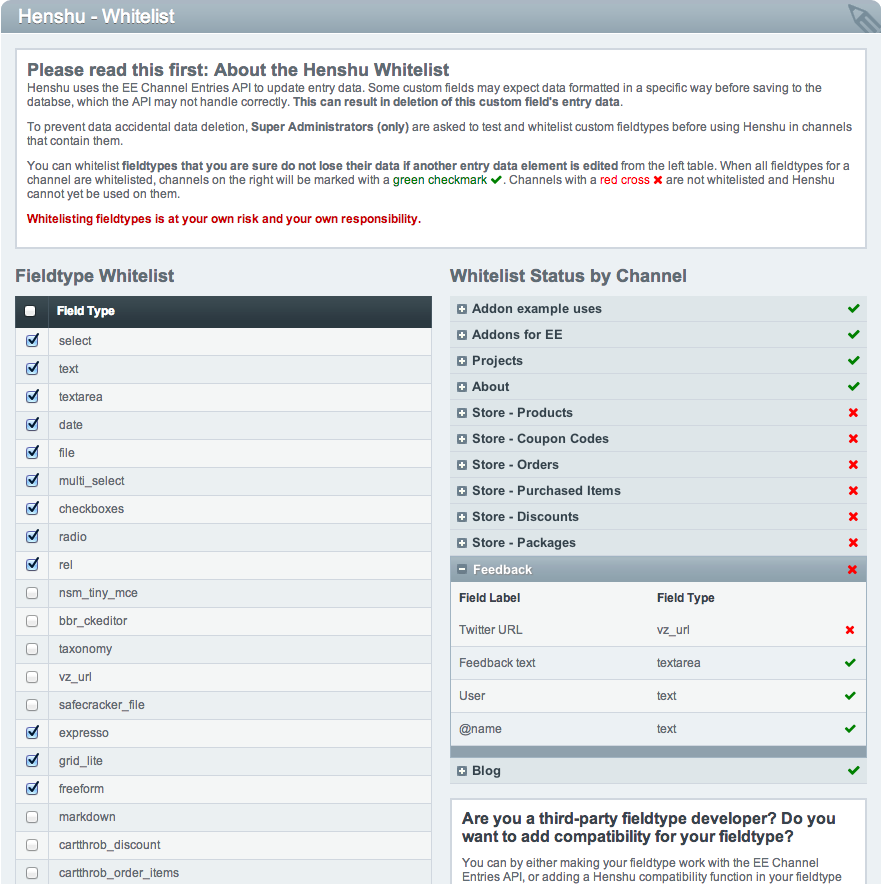
Whitelisting fieldtypes is at your own risk and your own responsibility.
Installation
- Unzip the zip file you have downloaded
- Copy the hokoku folder found at system/user/addons/hokoku into your system/user/addons/ folder
- In the Control Panel, go to Add-Ons => Modules and click the install link next to Hokoku
- Install both the module and extension
- Verify that your EE cache folder (typically at
/system/user/cache) has the right permissions (777). Hokoku uses this folder to build the export file.
Update Instructions
- Unzip the update zip file you have downloaded.
- Copy the hokoku folder found at system/user/addons/hokoku into your system/user/addons/ folder, overwriting its contents.
- In the Control Panel, go to Add-Ons => Modules and click the “Run Modules Updates” link in the top right of the screen.
- The module list should then show the latest version of the add-on.
Enabling access to Hokoku for other member groups
As Hokoku is a module, to enable access to Hokoku for target member groups outside of Super Admins, module access must be enabled.
- As a Super Administrator, go to Add-ons » Modules » Hokoku » Member Access Settings
- Under Enable module for the following member groups:, select the member groups which should get access to Hokoku
NOTE: Enabling Hokoku for member groups will also enable display and access to the ADD-ONS and ADD-ONS => Modules sections in the Control Panel’s top navigation. This is a requirement of ExpressionEngine to be able to completely access Hokoku. To disable display/access to these sections afterwards, please visit the individual member group’s preferences.
Usage
- Creating your First Export Profile
- Managing Export Profiles
- Managing Member Access to Export Profiles
- Exporting from Zenbu
- Exporting from a Template
Creating your First Export Profile
After installing Hokoku, visit Zenbu and click on the Export button, followed by Manage export profiles , or access Hokoku directly from the CP => Add-ons => Hokoku.
- To create a new export profile, select “Create new export profile”
- In Profile name, give your export profile a name. This will appear in Zenbu after using the Export this search button and selecting the profile for export.
- Select a file format. Choices are currently CSV, HTML and JSON
- Under Options, complete the options for your export file format. For the Filename, EE date format characters are accepted, eg. export_%Y-%m-%d.
- (If permitted) Chose to copy this export profile to a member group by selecting it from the list
- Save this export profile to save your settings.
Managing Permissions to Export Profiles
In the Permissions section, administrators can set permissions for each member group
- Can administrator own profiles: users from selected member groups can edit/delete their own export profiles
- Can view and use group profiles: users from selected member groups can view and use (not edit/delete) export profiles common for the member group.
- Can administrator group profiles: users from selected member groups can edit/delete export profiles common for the member group. This is usually for member groups with a more administrative role
- Can access Member Access Settings: users from selected member groups can access the Member Access Settings section. This is a powerful permissions and should be granted to member groups with more administrative roles.
Exporting from Zenbu
- From within Zenbu, set up your display columns and search filters as you normally want to view them in Zenbu.
- After displaying a listing of entries, click the Export button.
- A list of export profiles will display. Click the export profile that you want to use.
- A dialog window will open and the export begins. Wait while Hokoku builds the file with the contents currently displayed in Zenbu. Once complete, you can download the file from the “Download” button.
Installation
- Unzip the zip file you have downloaded
- Copy the zenbu folder found at system/user/addons/zenbu into your system/user/addons/ folder
- Copy the zenbu folder found at themes/user/zenbu into your themes/user/ folder
- In the Control Panel, go to the Add-Ons Manager section and click the “install” link next to “Zenbu”
- You can access the add-on from the Add-On Manager by clicking the “Gear” icon.
Update Instructions
- Unzip the update zip file you have downloaded.
- Copy the zenbu folder found at system/user/addons/zenbu into your system/user/addons/ folder, overwriting its contents (i.e. make sure old files are not present in the folder).
- Copy the zenbu folder found at themes/user/zenbu into your themes/user/ folder, overwriting its contents (i.e. make sure old files are not present in the folder).
- In the Control Panel, go to the Add-Ons Manager section and click the “Update” link next to Zenbu.
- The module list should then show the latest version of the add-on.
Usage
Entry Manager
The Entry Manager section is Zenbu’s main section. You can reach it from the Addons section or from the Control Panel’s main navigation, under Edit for member groups that have this feature turned on.
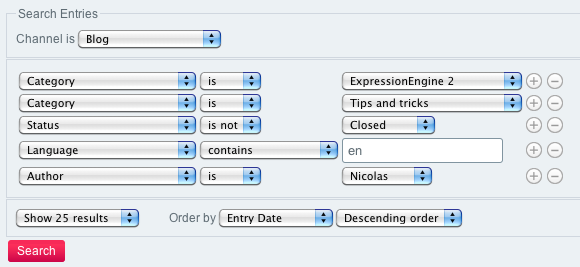
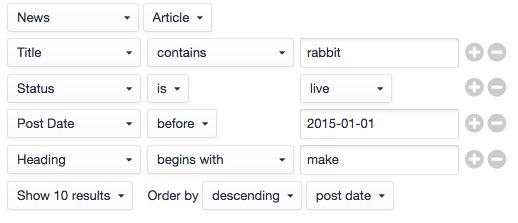
Entry filtering: Entries can be filtered using the various dropdowns in the “Search Entries” search form. Click the button to add a filtering rule, and the button to remove a filtering rule. Without any channel filtering, Zenbu displays entries from all channels with columns set up according to the All Channels display settings. When filtering by channel, additional entry data columns specific to the selected channel are displayed. Entries can be filtered by channel, status, sticky state, author, category, number of entries displayed by page, etc.
Displayed Entry data longer than screen: Some entries have a lot of data, and the results table in Zenbu may be longer (or wider) than the Control Panel width. In those cases, scroll the results table to the right to see the remaining columns. Alternatively, turn off the display of some columns from the Display settings section.
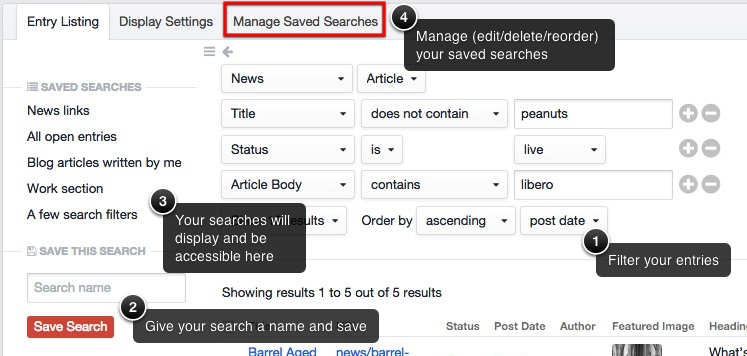
Saved Searches
Searches made in Zenbu can be saved for later re-use. This is useful for quickly retrieving complex search results or to keep track of your entries.
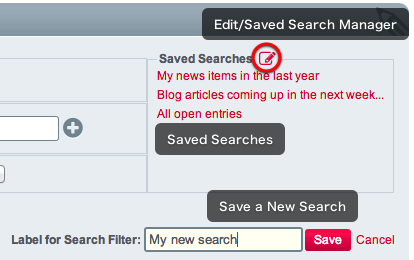
After completing a Zenbu search, save the search by clicking the Saved Searches button ( icon), then select Save this search. Give the search a name, and click the “Save” button. The search will then be available in the “Saved Searches” dropdown.
Saved Search Manager
Clicking the Managed Saved Searches in the Saved Searches dropdown allows you can manage saved searches through a dialog window.
- To change the label of a search, simply type in its text field. The label should update on its own.
- To change the order of saved searches, drag the searches using the left-hand side handles in the desired order. The order should update on its own.
- To delete a search, select it from the right-hand checkbox and click the Delete button at the bottom of the dialog.
Display settings
This section lets you control how entry data and custom fields are displayed in the Entry Manager section. You can access this section from the top-right Settings button ( icon) in Zenbu.
Showing/Hiding columns: Show columns by checking the checkbox in the “Available fields” column on the left pane. The column gets added in the right pabe. Hide columns by unchecking the same field.
Changing the order of fields: To change the order in which columns will be displayed in the Entry Manager, simply shuffle the column order by dragging the items in the right pane vertically using the left-side handles.
Extra options: Some columns offer additional display options. You can view these by clicking the “cogs” icon on the right of the enabled column.
Filter Settings: In this section you can customize general areas of Zenbu, such as the default sort setting, limit, etc.
Permissions
This powerful section lets you enable or disable access features for your own or other member groups, as well as grant or not access to the Zenbu module for specific member groups. You can access this section from the top-right Settings button ( icon) in Zenbu.
Installation
- Unzip the zip file you have downloaded
- Copy the zenbu folder found at system/expressionengine/third_party/zenbu into your system/expressionengine/third_party/ folder
- Copy the zenbu folder found at themes/third_party/zenbu into your themes/third_party/ folder
- In the Control Panel, go to Add-Ons » Modules and click the "install" link next to "Zenbu"
- Install both the module and extension
- You can access the add-on from the Modules section of the Control panel, or initially if you're a Super Administrator, from the navigation "Content » Edit" dropdown menu.
Update Instructions
- Unzip the update zip file you have downloaded.
- Copy the zenbu folder found at system/expressionengine/third_party/zenbu into your system/expressionengine/third_party/ folder, overwriting its contents.
- Copy the zenbu folder found at themes/third_party/zenbu into your themes/third_party/ folder, overwriting its contents.
- In the Control Panel, go to Add-Ons » Modules and click the “Run Modules Updates” link in the top right of the screen.
- The module list should then show the latest version of the add-on.
Enabling access to Zenbu for other member groups
As Zenbu is a module, to enable access to Zenbu for target member groups outside of Super Admins, module access must be enabled.
- In Members » Member groups, click the Edit group link for your target member group
- Enable (set to “yes”) the following permissions:
- Module Access Privileges » Can access module: Zenbu
- Control Panel Access » Can access ADD-ONS section
- Control Panel Access » Can access ADD-ONS » Modules
- At the bottom of this page, click the “Update” button to save these settings.
Usage
Edit channel entries section
The Edit Channel Entries section is accessible from the Modules section or from the Control Panel's main navigation, under Content » Edit, for member groups that have this feature turned on.
Entry filtering: Entries can be filtered using the various dropdowns in the "Search Entries" search form. Click the "+" button to add a filtering rule, and the "-" button to remove a filtering rule. Without any channel filtering, Zenbu displays entries from all channels with columns set up according to the "Multi-Channel Entry Listings" display settings. When filtering by channel, additional entry data columns specific to the selected channel are displayed. Entries can be filtered by channel, status, sticky state, author, category, number of entries displayed by page, etc.
Displayed Entry data longer than screen: Some entries have a lot of data, and the results table in Zenbu may be longer than the Control Panel width. In those cases, scroll the results table to the right to see the remaining columns. Alternatively, turn off the display of some columns from the Display settings section.
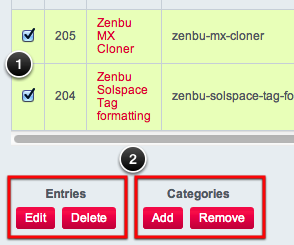
Multi-edit entries: Multiple entries can be selected for editing or deletion by checking the left-hand checkboxes next to the corresponding entries, followed by clicking the "Edit" or "Delete" buttons at the bottom of the control panel. Categories can be added or removed in a similar way, by selecting "Add" or "Remove" under the Categories label.
Saved Searches
Searches made in Zenbu can be saved for later re-use. This is useful for quickly retrieving complex search results, keeping track of your entries, or for exporting data using the Hokoku module.
After completing a Zenbu search, save the search by clicking the Save this Search button. Give the search a name, and click the "Save" button. The search will then be available in the "Saved Searches" section.
Saved Search Manager
Clicking the Edit icon in Zenbu's "Saved Searches" section, you can manage saved searches.
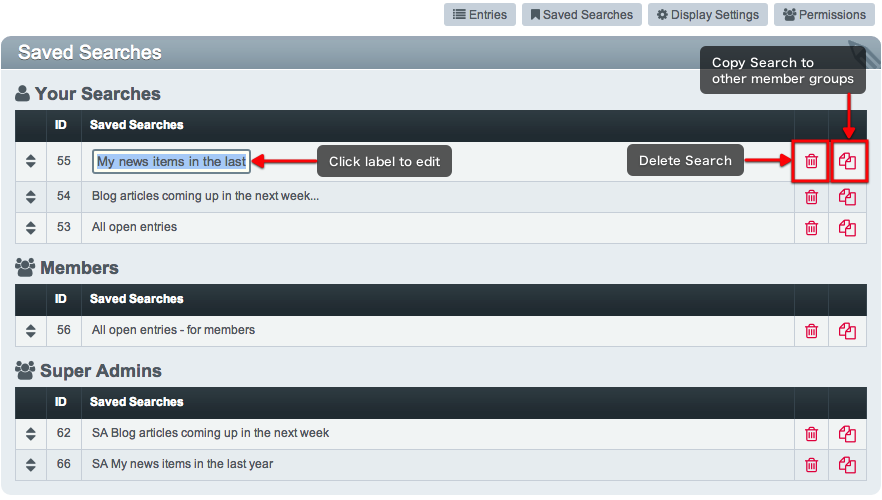
- To change the label of a search, clicks its label. Click outside of the input field to save.
- To change the order of saved searches, drag the searches using the left-hand side handles in the desired order.
- To delete a search, click the Delete link on the right
- To copy a search to member groups, click the Copy link on the right, and assign the member groups to which you want to copy the search.
Display settings
This section lets you control how entry data and custom fields are displayed in the Edit channel entries section.
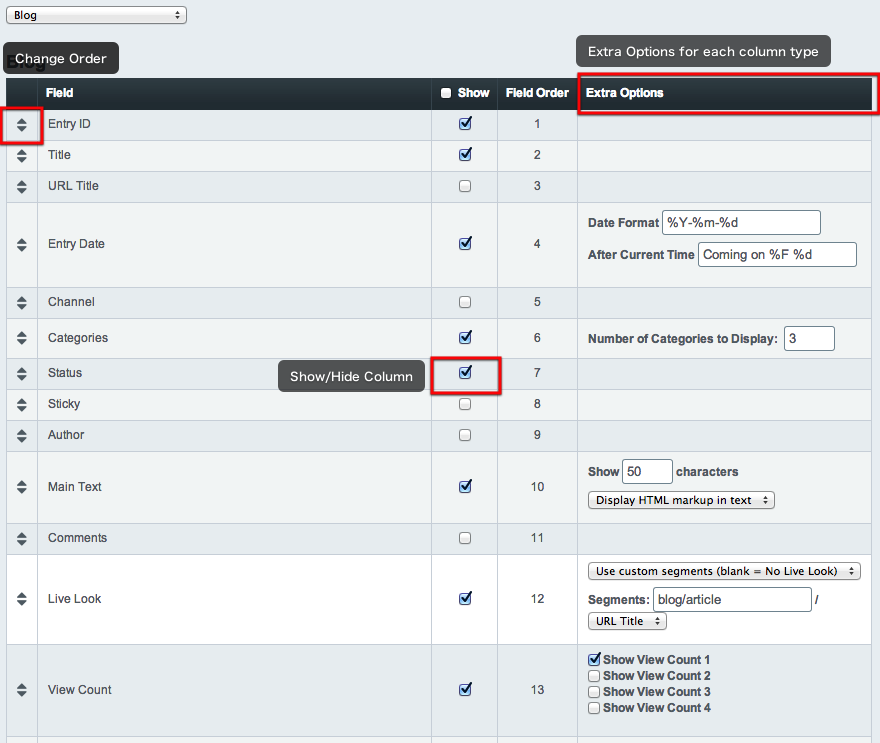
Showing/Hiding fields: Show fields by checking the checkbox in the "Show field" column for each field.
Changing the order of fields: To change the order in which columns will be displayed in the Edit channel entries panel, simply shuffle the field order by dragging the table cells vertically using the left-side handles.
Extra options: Certain fields offer additional display options. For example:
- Show X characters: limit the number of characters displayed in columns corresponding to input, textareas, and common wysiwyg-type fields.
- Date Format and After Current Time: Instead of the standard EE date formating, custom date formating can be used here. The "After Current Time" setting allows for additional custom date display when the entry date is in the future.
- Number of Categories to Display: Limits the number of categories displayed in the Zenbu column. Additional categories can be revealed by clicking the ellipsis "..." icon.
- Live Look settings: If Live Look settings are set for a channel, the Live Look link will point to this URL. Afternatively, a custom Live Look URL can be set here.
- Show matrix in row: instead of displaying a "Show matrix" link, which opens the Matrix data in a modal window, you can display data from Matrix fields directly in custom field column.
Quick access to each channel: The display settings are per channel, with the addition to settings for the general "Multi-Channel Entry Listings". Display Settings must be saved between switching channels (except for the "- All Channels -" section, which lists all channels. Users may have performance issues with this option, therefore it is last in the list). Tabs can be used to switch channels. However, after a certain number of channels, the display changes for a more manageable select field.
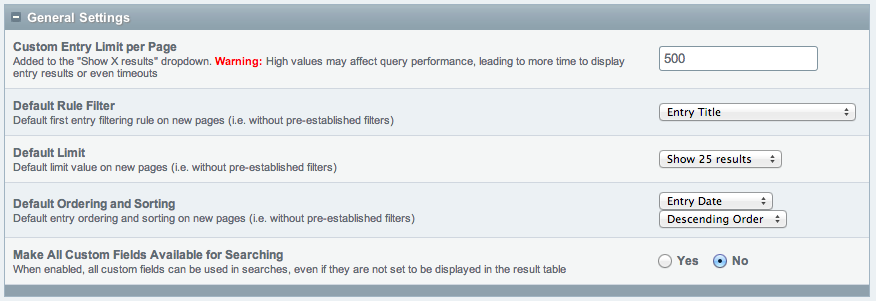
General Settings: In the Display Settings section, expand the "General Settings" tab to customize general areas of Zenbu, such as the default entry filter when loading Zenbu, the default sort setting, limit, etc.
Permissions
This powerful section lets you enable or disable access features for your own or other member groups, as well as grant or not access to the Zenbu module for specific member groups. You can access this section from the top-right Permissions link in Zenbu.
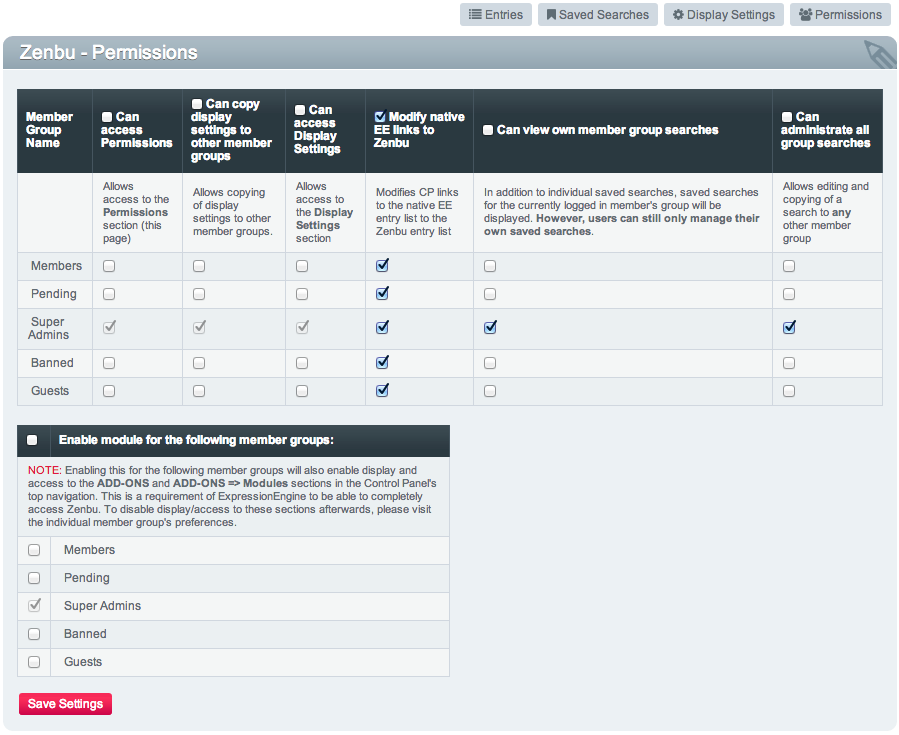
After installation, only Super Admins can access this panel, which can then open access to other member groups later.
A description of each option can be found in the screenshot above.
Installation
- Unzip the zip file you have downloaded
- Copy the zenbu folder found at system/user/addons/zenbu into your system/user/addons/ folder
- Copy the zenbu folder found at themes/user/zenbu into your themes/user/ folder
- In the Control Panel, go to the Add-Ons Manager section and click the "install" link next to "Zenbu"
- You can access the add-on from the Add-On Manager by clicking the “Gear” icon, or initially if you're a Super Administrator, from the navigation “Edit” dropdown menu.
Update Instructions
- Unzip the update zip file you have downloaded.
- Copy the zenbu folder found at system/user/addons/zenbu into your system/user/addons/ folder, overwriting its contents.
- Copy the zenbu folder found at themes/user/zenbu into your themes/user/ folder, overwriting its contents.
- In the Control Panel, go to the Add-Ons Manager section and click the “Update” link next to Zenbu.
- The module list should then show the latest version of the add-on.
Usage
Note: This documenation is for Zenbu for EE2
Edit channel entries section
The Edit Channel Entries section is accessible from the Modules section or from the Control Panel's main navigation, under Content » Edit, for member groups that have this feature turned on.
Entry filtering: Entries can be filtered using the various dropdowns in the "Search Entries" search form. Click the "+" button to add a filtering rule, and the "-" button to remove a filtering rule. Without any channel filtering, Zenbu displays entries from all channels with columns set up according to the "Multi-Channel Entry Listings" display settings. When filtering by channel, additional entry data columns specific to the selected channel are displayed. Entries can be filtered by channel, status, sticky state, author, category, number of entries displayed by page, etc.
Displayed Entry data longer than screen: Some entries have a lot of data, and the results table in Zenbu may be longer than the Control Panel width. In those cases, scroll the results table to the right to see the remaining columns. Alternatively, turn off the display of some columns from the Display settings section.
Saved Searches
Searches made in Zenbu can be saved for later re-use. This is useful for quickly retrieving complex search results, keeping track of your entries, or for exporting data using the Hokoku module.
After completing a Zenbu search, save the search by clicking the Save this Search button. Give the search a name, and click the "Save" button. The search will then be available in the "Saved Searches" section.
Saved Search Manager
Clicking the Edit icon in Zenbu's "Saved Searches" section, you can manage saved searches.
- To change the label of a search, clicks its label. Click outside of the input field to save.
- To change the order of saved searches, drag the searches using the left-hand side handles in the desired order.
- To delete a search, click the Delete link on the right
- To copy a search to member groups, click the Copy link on the right, and assign the member groups to which you want to copy the search.
Display settings
This section lets you control how entry data and custom fields are displayed in the Edit channel entries section.
Showing/Hiding fields: Show fields by checking the checkbox in the "Show field" column for each field.
Changing the order of fields: To change the order in which columns will be displayed in the Edit channel entries panel, simply shuffle the field order by dragging the table cells vertically using the left-side handles.
Extra options: Certain fields offer additional display options. For example:
- Show X characters: limit the number of characters displayed in columns corresponding to input, textareas, and common wysiwyg-type fields.
- Date Format and After Current Time: Instead of the standard EE date formating, custom date formating can be used here. The "After Current Time" setting allows for additional custom date display when the entry date is in the future.
- Number of Categories to Display: Limits the number of categories displayed in the Zenbu column. Additional categories can be revealed by clicking the ellipsis "..." icon.
- Live Look settings: If Live Look settings are set for a channel, the Live Look link will point to this URL. Afternatively, a custom Live Look URL can be set here.
- Show matrix in row: instead of displaying a "Show matrix" link, which opens the Matrix data in a modal window, you can display data from Matrix fields directly in custom field column.
Quick access to each channel: The display settings are per channel, with the addition to settings for the general "Multi-Channel Entry Listings". Display Settings must be saved between switching channels (except for the "- All Channels -" section, which lists all channels. Users may have performance issues with this option, therefore it is last in the list). Tabs can be used to switch channels. However, after a certain number of channels, the display changes for a more manageable select field.
General Settings: In the Display Settings section, expand the "General Settings" tab to customize general areas of Zenbu, such as the default entry filter when loading Zenbu, the default sort setting, limit, etc.
Permissions
This powerful section lets you enable or disable access features for your own or other member groups, as well as grant or not access to the Zenbu module for specific member groups. You can access this section from the top-right Permissions link in Zenbu.
After installation, only Super Admins can access this panel, which can then open access to other member groups later.
A description of each option can be found in the screenshot above.
Installation
- Unzip the package
- Upload the /zenbu folder and its contents to your /craft/plugins folder.
- In the Craft CP, go to Plugins and click Install.
Usage
Main Section (Entry Listing)
Zenbu's main section is accessible from the Zenbu tab in the Craft Control Panel.
Entry filtering: Entries can be filtered using the various dropdowns. By default all entries from all sections are displayed. You can select a section and entry type to filter entries by that section/entry type. For further filtering, click the "+" or "-" button to add or remove a seach filter, respectively. When entries are filtered by a section/entry type, additional entry data columns specific to the selected channel are displayed. Entries can be filtered by section, status, author, category, number of entries displayed by page, etc.
Displayed Entry data longer than screen: Some entries have a lot of data, and the results table in Zenbu may be longer than the Control Panel width. In those cases, scroll the results table to the right to see the remaining columns. Alternatively, turn off the display of some columns from the Display settings section.
Saved Searches
Searches made in Zenbu can be saved for later re-use. This is useful for quickly retrieving complex search results or keeping track of your entries.
After completing a Zenbu search, save the search by giving it a name and clicking Save this Search button in the sidebar. The search will then be available in the "Saved Searches" section in the sidebar.
Saved Search Manager
Clicking the Manage Saved Searches tab in Zenbu will send you to a listing of your saved searches, which you can manage.
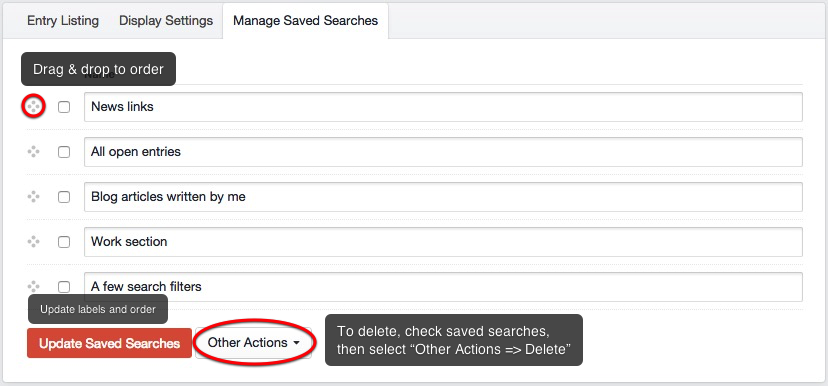
- To change the label of a search, change its label in the list. Click Update to save the changes.
- To change the order of saved searches, drag the searches using the left-hand side handles in the desired order. Click Update to save the changes.
- To delete a search, select the checkboxes corresponding to the searches to delete, and select Delete under the "Other Actions" button. You will be prompted to confirm deletion.
Display settings
This section lets you control how entry data and custom fields are displayed in each section in Zenbu.
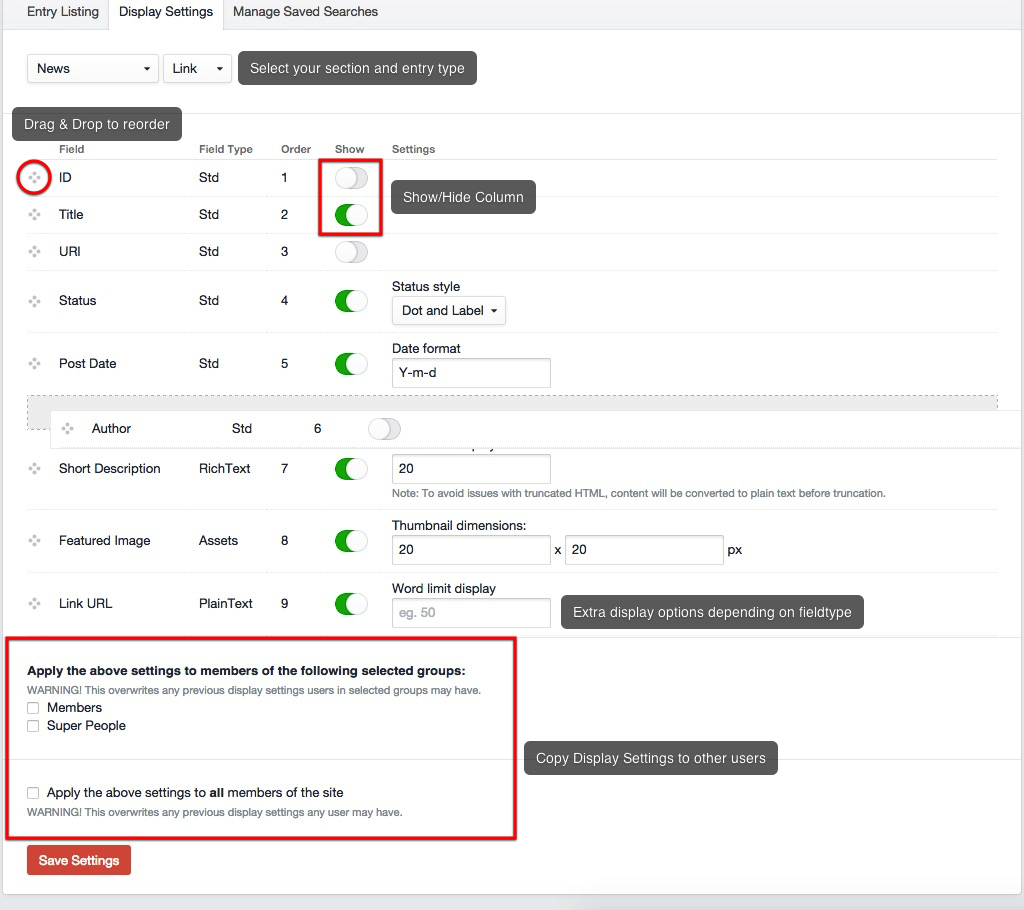
Showing/Hiding fields: Show fields by sliding the switch to the "on" position.
Changing the order of fields: To change the order in which columns will be displayed in Zenbu, simply shuffle the field order by dragging the table cells vertically using the left-side handles.
Extra options: Certain fields offer additional display options. For example:
- Word limit display: limit the number of words displayed in columns corresponding to input, textareas, and Rich Text fields.
- Date Format: Instead of the standard date formating, custom date formating can be used here, eg 'Y-m-d'.
- Show Matrix in Modal Window: instead of displaying the Matrix within the entry listing, you can set the Matrix to display in a modal window (popup) instead. Useful for saving space.